How to connect LORIOT sensors to Infodeck
Connect an existing LORIOT application to receive sensor readings in Infodeck. Your sensors remain registered on LORIOT.
Quick summary: Create a connector, copy its webhook details into a LORIOT HTTP Push output, register each sensor as an Infodeck asset and confirm a new reading.
Before you begin
You need:
- Permission to view, create and update integrations, register assets and use the relevant locations and Asset Types.
- Access to the LORIOT application containing your sensors and permission to manage its outputs and access tokens.
- A sensor already transmitting on LORIOT, with its DevEUI available.
- An IoT Asset Type with the correct decoder and measurement fields for the sensor model. Ask your administrator if you are unsure which type to select.
Start with one sensor. Creating the connector does not automatically copy LORIOT's device list into Infodeck.
1. Create the connector
- Open Settings → Integrations.
- Click Add connector, select IoT networks, then choose LORIOT.
- Enter a Connector name, such as
Building sensors, and an optional Description. - Click Create and continue. The Complete connector setup editor opens.
- In Access token, paste the application access token from LORIOT.
- Click Save changes.
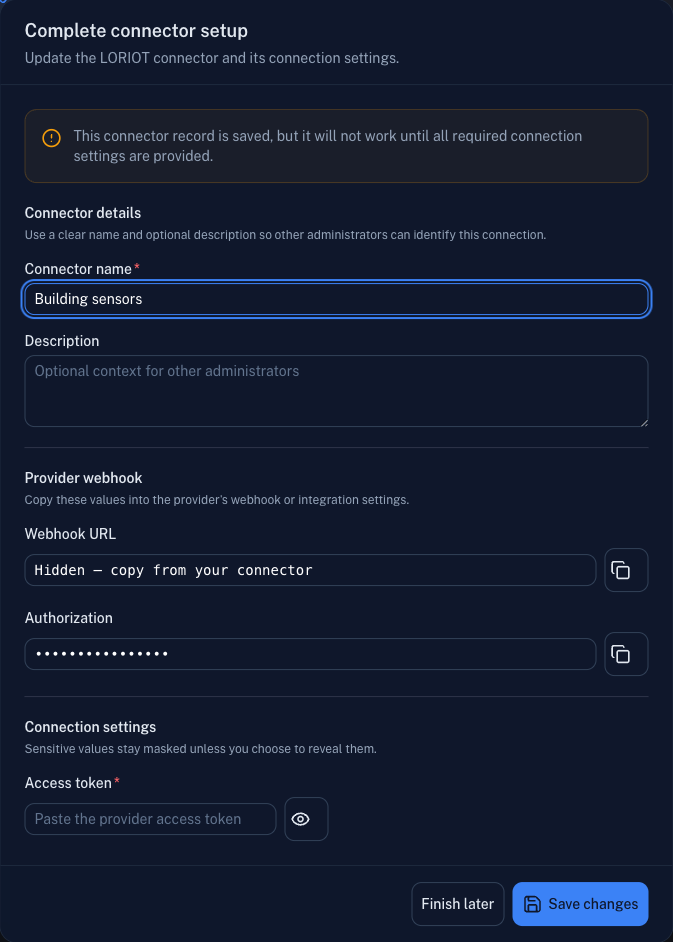
Names and connection values are hidden. The editor shows incomplete setup, not a verified connection.
Obtain the token from the intended application's access-token settings. LORIOT's Access Tokens guide explains that this token identifies the application and server and is used for provider access, including downlinks.
Access token is issued by LORIOT for Infodeck to contact LORIOT. The Authorization value under Provider webhook is issued by Infodeck for incoming readings. Keep them in their respective fields; one does not replace the other.
2. Configure the LORIOT output
- Open your Infodeck connector and click Edit connector.
- Under Provider webhook, use Copy webhook URL and Copy authorization when completing the next steps.
- In LORIOT, open the application containing your sensor and its output settings. Add an HTTP Push output.
- Set the output's target URL for POST requests to the copied Webhook URL.
- Set its custom
Authorizationheader to the complete copied authorization value. Do not add another prefix. - Enable uplink messages and save the output. Keep the original LORIOT uplink message format and raw sensor data.
LORIOT separates uplink messages (rx) from gateway messages (gw). This connector processes rx messages; sending only gateway messages will not produce readings. See LORIOT Application Outputs. Output labels can vary by server version.
Keep connection values confidential. Copy them directly between the two services, and preserve any other outputs your application still needs.
3. Register the sensor in Infodeck
- Open Assets and click Register Asset.
- Select the sensor's IoT Asset Type and enter an Asset Name, such as
Meeting room temperature sensor. - Set Integration Service to your LORIOT connector.
- In Device UUID, enter the sensor's DevEUI from LORIOT: 16 hexadecimal characters, without spaces or separators. Preserve leading zeros.
- Select its Location, complete any other required fields and click Register Asset.
The field is called Device UUID, but for this connector it must contain the DevEUI. Do not use the application ID, an activation key or a display name.
The Asset Type's decoder turns incoming sensor data into measurement values. Selecting a physical-only Asset Type will not provide the IoT registration fields.
Field reference
| Field | Required | What to enter |
|---|---|---|
| Connector name | Yes | A recognizable label, up to 256 characters. |
| Description | No | Helpful context, up to 1,000 characters. |
| Access token | Yes for connector setup | The token issued for the LORIOT application. |
| Webhook URL | Copy only | Infodeck's receiving address; use it as the LORIOT output destination. |
| Authorization | Copy only | Infodeck's incoming-request credential; use it in the LORIOT output header. |
| Asset Type | Yes | An IoT type with the appropriate sensor decoder. |
| Asset Name | Yes | A name that identifies this sensor. |
| Integration Service | Yes | The LORIOT connector receiving this sensor's messages. |
| Device UUID | Yes | The sensor's DevEUI. |
| Location | Yes | Where the sensor is installed. |
| Active Timeout (minutes) | No | Reporting interval allowance, if used by your installation. |
4. Confirm a real reading
- Wait for the sensor's next transmission or use its normal test function.
- Check that the new uplink appears in LORIOT and the output is enabled.
- In Infodeck, open the asset and check IoT Status → Last Uplink.
- Confirm the time advances, then check Reading history, current values and units.
An enabled output or a successful delivery response does not prove that measurements were stored. Complete this check before adding the rest of your sensors.
Correct a mistake later
Open Settings → Integrations → your connector → Edit connector, update the settings and click Save changes. When an access token is already stored, leaving its masked field blank keeps it. To replace it, paste the new token.
If the output URL, authorization or message options are wrong, correct them in LORIOT. Saving the Infodeck connector does not update the remote output.
Troubleshooting
| What you see | What to check |
|---|---|
| Complete connector setup is still shown | Enter the LORIOT application token and save. Creating a record alone does not finish setup. |
| LORIOT reports an authorization error | Copy authorization from the matching Infodeck connector again; do not substitute the LORIOT access token. |
| LORIOT receives messages but Infodeck has no readings | Confirm HTTP Push is enabled and sends rx uplinks. Match the DevEUI and Integration Service on the asset. |
| Delivery succeeds but measurements are missing | Keep raw uplink data and check the Asset Type decoder. Gateway-only or decoded-only messages are unsuitable for this setup. |
| A sensor identifier is already registered | Find the existing asset before trying again. Ask your administrator to check its connector and location. |
| Readings work but commands fail | Check the application access token, device capabilities and configured actions with Support. Incoming webhook authorization does not authorize commands. |
Example: meeting room temperature
Create Building sensors, add its HTTP Push output to the LORIOT application and register Meeting room temperature sensor with the matching IoT Asset Type. Enter that sensor's DevEUI in Device UUID and select the meeting room location. Confirm the next temperature reading and its timestamp before registering sensors in other rooms.
Related guides
Need help with a decoder or the first reading? Contact Infodeck Support.