Choose a Feedback Tablet Panel or a Forms QR Code
Choose how visitors will respond before setting up feedback at a location or asset.
Use a Feedback panel for quick ratings and fault choices on a shared tablet. Use a public Regular Form with an association QR code when visitors should answer questions on their own phones.
Compare the Options
| Consideration | Feedback tablet panel | Forms association QR code |
|---|---|---|
| Equipment | A dedicated tablet, power and an internet connection | Printed QR signage; visitors use their own phones and internet connections |
| Visitor journey | Tap a rating and, where prompted, select fault topics | Scan the QR code, open the form in a browser and answer its questions |
| Questions | Rating choices and configured fault topics | Custom questions, such as ratings, choices, comments and photos |
| Location or asset | A location binding, with an optional asset at that location | A separate association for each location or asset |
| Ready to collect | Published panel, active location binding and paired tablet | Active Regular Form, enabled association and Require Authentication turned off for public access |
| Where staff review answers | The panel's Responses section | The form's Responses tab |
Choose a tablet when visitors should be able to respond without using a phone. Choose QR signage when you want to cover several locations or assets without installing a tablet at each one.
Before You Begin
- Check that the relevant Feedback or Forms area is available in your workspace. Ask your administrator if it is missing.
- You need permission to configure the panel or form, manage its locations or associations, and review responses. Publishing a Feedback panel requires separate permission.
- Create the locations or assets you want responses to identify.
- Plan for internet access. Confirm that a response has been saved before treating it as collected.
A QR code does not make every form public. For visitors without an account, use a Regular Form with Require Authentication turned off. Check the questions too: a public form can still ask for names, contact details or other identifying information.
Set Up a Feedback Tablet
- Open Feedback and click Create feedback panel. Enter a Panel name, choose a Feedback template and create the panel.
- In Design, configure the rating choices, wording and topics. Click Save draft, then Publish and confirm Publish in the dialog.
- Open Locations & tablets and click Add location binding. Enter a Binding name, choose the Location and, if needed, an Asset (optional) from that location. Click Save.
- Select the location binding and click Pair tablet. Enter a Tablet name and click Generate pairing code. On the tablet, scan the setup QR or open the setup link, then enter the pairing code shown in the dialog.
- Check that the tablet shows the intended location and feedback screen. Configure the tablet's kiosk mode so visitors remain in the feedback screen, then submit a test response and check it in Responses.
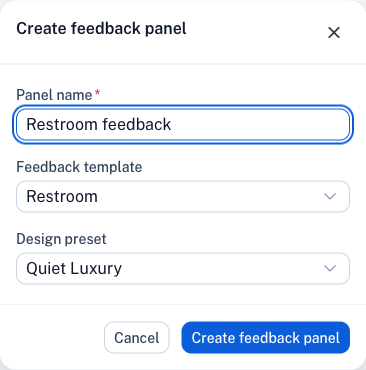
Example setup before creating a panel. Choose the template and design preset for your location.
Keep the panel enabled and its location binding active with a published layout. Saving a later draft alone does not change the published screen.
On panels with optional topics, happy-face ratings save directly; middle and unhappy ratings open the fault choices. If topics are required, visitors must select a topic after every rating. After a saved response, the tablet shows confirmation and resets for the next visitor.
The QR code in Pair tablet opens tablet setup and requires a separate pairing code. Keep it with the installer. Use a Forms association QR code for signs that visitors scan to submit on their phones.
Set Up Feedback by Phone
- In Forms, create or edit a Regular Form. Set Assignment Type to Location, Asset or Both and select the locations or assets. Turn off Require Authentication if visitors should respond without signing in.
- Add your questions in the designer, such as a rating, fault choice, optional comment or photo question. Finish the wizard with Save as Draft for a new form or Save Changes when editing.
- Open the form's Associations tab. If the location or asset is missing, click Add Association. Choose Location and use Select Location, or choose Asset and enter its Asset ID. Click Add Assignment. The available types follow the form's Assignment Type setting.
- Make sure the association's switch is on. Use Change Status → Active to activate the draft. If you already used Create & Publish when creating the form, check that its status is Active.
- On the correct association, click Download QR code. Print it with a clear location or asset name. Copy URL is available if you also want to share the link.
- Before posting the sign, scan the actual code on a phone without signing in. Complete a test response, wait for Thank you!, then check the form's Responses tab for the answers and correct location or asset.

For public access, turn off Require Authentication. The form must also be active and its association enabled.
Keep the form active and the association enabled while the sign is in use. If the visitor sees Sign-in required, check Require Authentication. If they see Link inactive, check the association's switch.
Turn Feedback into Follow-up Work
Collecting a response and creating follow-up work are separate steps.
- Feedback panels: work creation is off by default. In Design, enable Create work request for this topic for the relevant topic, select a work request template and publish the change. Existing approval rules still apply. Repeated-report grouping is a separate option.
- Public Forms: configure Form Automation if matching responses should create work requests. Review the response's automation outcome as well as its saved answers.
Example: Feedback in Two Restrooms
For Restroom A, install a Feedback tablet so visitors can tap a rating as they leave. For Restroom B, post a QR code for a Regular Form with a rating, fault choice and optional comment. Associate each setup with its own location and test one response from each before making it available to visitors.
Related Articles
Need help? Contact Infodeck Support